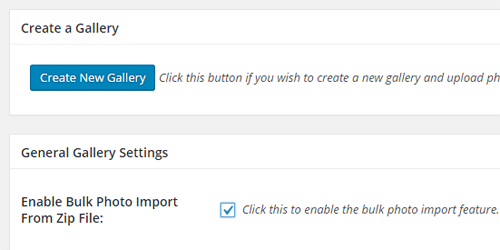
You can always select multiple images and upload them in one go when you create your photo galleries using the default gallery creation interface. However, if you want to bulk upload photos from a zip file and create a gallery from the images (contained within the zip file) then you can use the bulk upload feature of the plugin.
The following steps will show you how to use it:
Step 1) Go to the “Gallery” menu of the plugin and check the “Enable Bulk Photo Import From Zip File” field to enable this option.

Step 2) Create a zip file with the photos you want to import to your photo gallery. The photos must be located in the root of the zip file (not in sub-folders).
Step 3) FTP the zip file to the following folder of your server
wp-content/uploads/wp_photo_seller/bulk_import/
Step 4) Create a new gallery or edit an existing gallery from the photo seller’s “Gallery” menu.
Step 5) Go to section called “Bulk Import Images” and enter the name of the zip file. The plugin will read that zip file and import all the images into the gallery.
Important Notes
The plugin has no limit on the size of the zip file. However, your server will have PHP RAM memory limit for your site (this limit can vary based on the hosting plan you are using). The unzipping and processing of a zip file can use a lot of server memory and resources depending on how large the zip file is. So you need to make sure your server has sufficient free PHP memory otherwise the processing will fail.
You should be mindful not to overload the server with huge zip files because it may exhaust the server’s memory during the bulk upload process. If a bulk upload fails or hangs, you should try a smaller zip file by reducing the number of images inside it. Alternatively, contact your hosting provider and request them to increase your PHP RAM memory limit then try again.